Remote Debugging with IDA from Windows to Linux
Sometimes it happens, in my case, in CTF challenge - the day when you received an ELF binary but your host machine is Windows and your IDA+license is already installed on your host. One option is to install a free version of IDA on a virtual Linux machine but there is another option that sounds in the beginning complex, but actually it is not.
This option called “Remote Debugging”, the ability to debug a process from your host while it runs on a “remote” machine or in my case, virtual machine.
The scenario: We need to debug 32-bit ELF binary from our Windows host while it will run on a 64-bit Ubuntu virtual remote machine.
Note: This post will help you in other scenarios (32/64 bit binary and 32/64 bit target machine).
TL;DR
- [Windows] Load the 32-bit ELF binary to IDA (for 32-bit!)
- [Windows] Load Remote debugger on IDA and choose Linux remote debugger
- [Linux] Setup Ubuntu with x86 support (only if you plan to run 32-bit binary on Ubuntu 64 bit)
- [Linux] Run the IDA server on the Ubuntu virtual machine to connect to the debugger
- Debug!
Load ELF binary to IDA
The first thing to do, is to start IDA (for 32-bit) on our host machine (Windows) and load the ELF file:

Load Remote debugger on IDA
We will select the remote debugger on IDA by clicking on Debugger->Select debugger...:

We will choose the “Remote Linux debugger”:

Setup the remote debugger on IDA
We need to set up the debugger settings, go to Debugger->Process options...:

You will need to fill the full path of the ELF file in the Application and Input file fields, the directory path in the Directory path field and the IP address of the machine in the Hostname field.

The parameters field is in case you need to run the program with some parameters.
Setup support for x86 on Ubuntu x64 (optional)
This is a special case when your ELF binary is 32-bit and Ubuntu is 64-bit.
In this case, you will need to add support for 32-bit on Ubuntu, otherwise, if you plan to run 64-bit binary on 64-bit platform, you can skip this stage.
In my case I used this link to learn how to do it and run the following commands:
sudo dpkg --add-architecture i386
sudo apt-get update
sudo apt-get install libc6:i386 libncurses5:i386 libstdc++6:i386
Check that you can the 32-bit ELF file on Ubuntu 64-bit and continue.
Run IDA server on the target (Ubuntu) machine
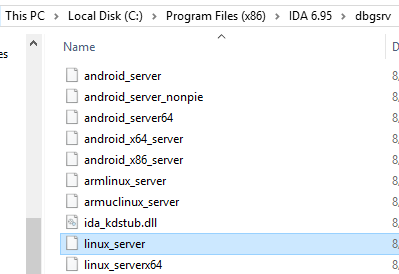
IDA has server programs to connect its IDE, in our case, the path is C:\Program Files (x86)\IDA 6.95\dbgsrv and we will choose the server that fits the binary 32-bit file: linux_server (32-bit server)

This is important, if you have 32-bit file, you need the IDA server to support the same architecture - 32-bit.
We will copy this file to the Ubuntu machine and run it.

It is now listening…
Debug!
Now, all we need to do is to start the debugger:

We will get a warning:

Press “Yes” and it will run, check the status from the server:

Put breakpoints in a place you want to stop it from running and run it again:

Troubleshoot Common Problems
1. Architecture issue — “Incompatible debugging server”
If you get this error:

Following by this one:

You probably chose the wrong version of the server: if the binary you want to debug is x86 file, you need x86 IDA server and for x64 file, you need x64 IDA server.
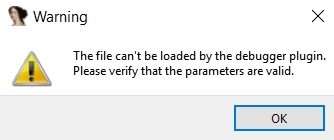
2. The Server is not running — ”The file can’t be loaded by the debugger plugin”
If you get only this error:

Your server is probably not running.
3. Running IDA 64-bit while the IDA server is 32-bit — “failed to reset program counter to…”
In such a case, if you put a breakpoint inside the program you will see an error like: “failed to reset program counter to…”

Or error like “IDA error: got SIGSEGV signal (Segmentation violation)”
Make sure the IDE and the server have the same architecture.
Summary
Remote debugging with IDA is not complex, it is a great feature to use when you already have your IDA installed on the host with all your plugins. I used it number of times to solve CTF challenges. This post should help you to setup it in any scenario when you have Windows machine as host and Linux as a remote machine. Enjoy :)